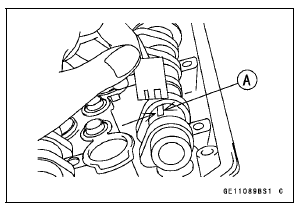

Place a strip on each journal parallel to the camshaft installed in the correct position.

NOTE
Do not turn the camshaft when the plastigage is between the journal and camshaft cap.
Camshaft Journal/Camshaft Cap Clearance Standard: 0.038 ∼ 0.081 mm (0.0015 ∼ 0.0032 in.) Service Limit: 0.17 mm (0.0067 in.)
If any clearance exceeds the service limit, measure the diameter of each camshaft journal with a micrometer.
Camshaft Journal Diameter Standard: 23.940 ∼ 23.962 mm (0.9425 ∼ 0.9434 in.) Service Limit: 23.91 mm (0.9413 in.)
If the camshaft journal diameter is less than the service limit, replace the camshaft with a new one and measure the clearance again.
If the clearance still remains out of the service limit, replace the cylinder head unit.
 Camshaft Installation
 Camshaft Runout Inspection
Special Tools and Sealants
Outside Circlip Pliers:
57001-144
Piston Pin Puller Assembly:
57001-910
Piston Ring Compressor Grip:
57001-1095
Piston Ring Compressor Belt, 67
79:
57001-1097
Bearing Driver Set:
57001-1129
Liquid Gasket, TB1216B:
92104-1064
Liquid Gasket, TB1207B:
92104-2068
...
Armature Inspection
Using the × 1 Ω hand tester range, measure the resistance
between any two commutator segments [A].
Special Tool - Hand Tester: 57001-1394
If there is a high resistance or no reading (∞) between any
two segments, a winding is open and the starter motor
must be replaced.
...
Wear Inspection
Remove the left front footpeg bracket
bolts.
A. Front Footpeg Bracket
B. Bolts
Remove the bolts and chain cover.
A. Bolts
B. Chain Cover
Stretch the chain taut either by using
the chain adjusters, or by hanging a
10 kg (22 lb) weight on the chain.
Measure the lengt ...