
| WARNING Coolant can be extremely hot and cause severe burns, is toxic and very slippery. Do not remove the radiator cap or attempt to change the coolant when the engine is hot; allow it cool completely. Immediately wipe any spilled coolant from tires, frame, engine or other painted parts. Do not ingest coolant. |
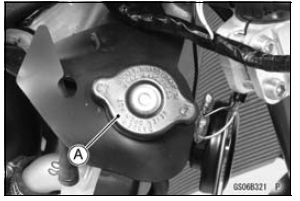
Remove the radiator cap in two steps. First turn the cap counterclockwise to the first stop. Then push and turn it further in the same direction and remove the cap.
Torque - Coolant Drain Bolt (Water Pump): 9.8 N┬Ęm (1.0 kgf┬Ęm, 87 in┬Ęlb)
NOTE
Pour in the coolant slowly so that it can expel the air from the engine and radiator.
NOTICE
Soft or distilled water must be used with the antifreeze (see below for antifreeze) in the cooling system.
If hard water is used in the system, it causes scales accumulation in the water passages, and considerably reduces the efficiency of the cooling system.
Water and Coolant Mixture Ratio (Recommended)
Soft Water: 50%
Coolant: 50%
Freezing Point: ŌĆō35┬░C (ŌĆō31┬░F)
Total Amount: 2.6 L (2.7 US qt)
NOTE
Choose a suitable mixture ratio by referring to the coolant manufacturerŌĆÖs directions.
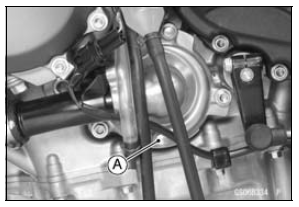
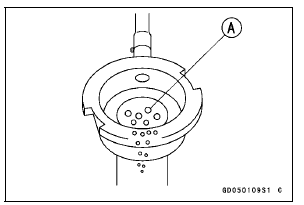
Start the engine with the radiator cap removed and run it until no more air bubbles [A] can be seen in the coolant.
Tap the radiator hoses to force any air bubbles caught inside.
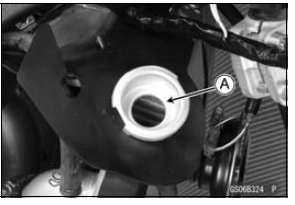
Stop the engine and add coolant up to the radiator filler neck.
If the coolant level is lower than the ŌĆ£LŌĆØ level line, add coolant to the ŌĆ£FŌĆØ level line (see Coolant Level Inspection).
NOTICE
Do not add more coolant above the ŌĆ£FŌĆØ level line.
 Fuel Hose Replacement
 Radiator Hose and O-ring Replacement
Gear Position Switch Installation
Securely place the springs [A] and pins [B] into the holes
[C] of the shift drum.
Apply grease to the new O-ring [D].
Install the gear position switch [E].
Apply a non-permanent locking agent to the threads of
the gear position switch screws [F].
Tighten:
Torque - Gear Position Swit ...
Electrical Leads
A two-color lead is identified first by the primary color and
then the stripe color. Unless instructed otherwise, electrical
leads must be connected to those of the same color.
Instrument
Use a meter that has enough accuracy for an accurate
measurement. Read the manufactureŌĆÖs instructions ...
Oil Filter Replacement
Drain the engine oil (see Engine Oil Change).
Remove the left lower fairing (see Lower Fairing Removal
in the Frame chapter).
Remove the oil filter [A] with the oil filter wrench [B].
Special Tool - Oil Filter Wrench: 57001-1249
Replace the filter with a new one.
Apply grease t ...