
NOTE
If the crankshaft is replaced with a new one, refer to the Connecting Rod Big End Bearing/Crankshaft Main Bearing Insert Selection in the Specifications.
NOTICE
If the crankshaft, bearing inserts, or crankcase halves are replaced with new ones, select the bearing inserts and check clearance with a plastigage (press gauge) before assembling engine to be sure the correct bearing inserts are installed.
Turn the oil groove side of the thrust washer to the crankshaft.
NOTE
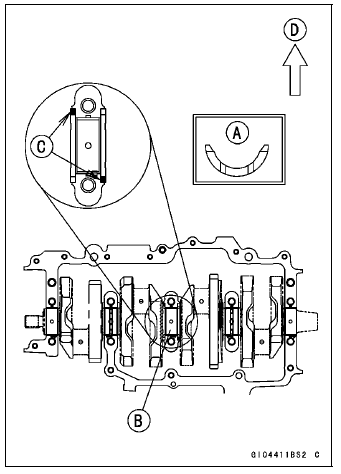
Front [D]
Connecting Rod Removal
 Crankshaft Removal
 Connecting Rod Installation
Stick Coil Input Voltage Inspection
NOTE
Be sure the battery is fully charged.
Turn the ignition switch to OFF.
Remove the ECU (see ECU Removal in the Fuel System
(DFI) chapter).
Do not disconnect the ECU connectors.
Connect a digital meter [A] to the connector [B] with the
needle adapter set.
Special Tool - N ...
What is a Limited Warranty?
The most important thing to know about your warranty is that it protects you
from manufacturing defects in material or workmanship during the warranty
period.
You can find the warranty period in the Kawasaki Limited Warranty Certificate
your Kawasaki dealer provided to you at the time of sale ...
Subthrottle Sensor Input Voltage Inspection
NOTE
Be sure the battery is fully charged.
Turn the ignition switch to OFF.
Remove the air cleaner housing (see Air Cleaner Housing
Removal in the Fuel System (DFI) chapter)
Disconnect the subthrottle sensor connector and connect
the harness adapter [A] between these connectors.
Spec ...