
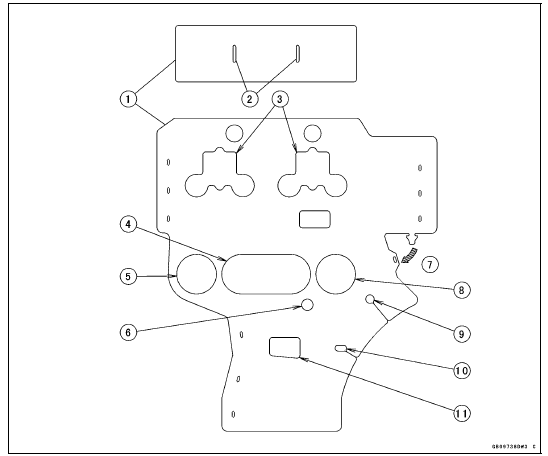
1. Heat Insulation Rubber Plate
2. For Air Switching Valve Hoses (Place the air switching valve above the rubber plate.)
3. For Air Suction Valve Cover
4. For Throttle Body Assy Holder #2 and #3
5. For Throttle Body Assy Holder #1
6. For Water Temperature Sensor
7. Insert the tab into the slot.
8. For Throttle Body Assy Holder #4
9. For Air Bleeder Hose
10. For Starter Motor Cable
11. For Crankcase Breather Hose
 CAL and SEA-B1 Models
 Engine No. ZXT00JE003023
Jump starting
If your motorcycle battery is “run
down�, it should be removed and
charged. If this is not practical, a 12
volt booster battery and jumper cables
may be used to start the engine.
DANGER
Battery acid generates hydrogen
gas which is flammable and
explosive under certain conditions.
It i ...
Chassis Parts Lubrication
Before lubricating each part, clean off any rusty spots with
rust remover and wipe off any grease, oil, dirt, or grime.
Lubricate the points listed below with indicated lubricant.
NOTE
Whenever the vehicle has been operated under
wet or rainy conditions, or especially after using a
high ...
Valve Clearance Inspection
NOTE
Valve clearance must be checked and adjusted when
the engine is cold (at room temperature).
Remove:
Crankshaft Sensor Cover (see Crankshaft Sensor Removal
in the Electrical System chapter)
Cylinder Head Cover (see Cylinder Head Cover Removal
in the Engine Top End chapter)
Turn t ...