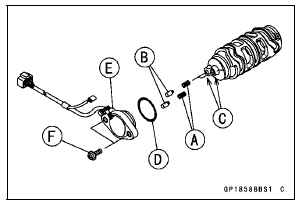


 Gear Position Switch Removal
 Gear Position Switch Inspection
Front Wheel Rotation Sensor Wiring Inspection (Service Code b 43)
Disconnect the front wheel rotation sensor lead connector
[A] (see Front Wheel Rotation Sensor Removal in the
Brakes chapter).
Disconnect the KIBS hydraulic unit lead connector (see
KIBS Hydraulic Unit Removal in the Brakes chapter).
Check the wiring continuity of the W lead and ...
Front Fork Removal (Each Fork Leg)
Loosen the front fork top plug [A] beforehand if the fork
leg is to be disassembled.
Special Tool - Top Plug Wrench (45 mm) [B]: 57001-1741
NOTE
Loosen the top plug after loosening the handlebar
clamp bolt [C] and upper front fork clamp bolt [D].
Remove:
Upper Fairing Assembly (see Up ...
Cylinder Head Warp Inspection
Clean the cylinder head.
Lay a straightedge across the lower surface of the cylinder
head at several positions.
Use a thickness gauge [A] to measure the space between
the straightedge [B] and the head.
Cylinder Head Warp
Standard: – – –
Service Limit: 0.05 mm (0.0020 in.)
...