
If the radiator fan relay is normal, check the wiring for continuity, using the wiring diagram in this section.
Special Tool - Hand Tester: 57001-1394
If the wiring is good, check the ECU for its ground and power supply (see ECU Power Supply Inspection in the Fuel System (DFI) chapter).
If the ground and power supply are good, replace the ECU (see ECU Removal/Installation in the Fuel System (DFI) chapter).
Radiator Fan Circuit
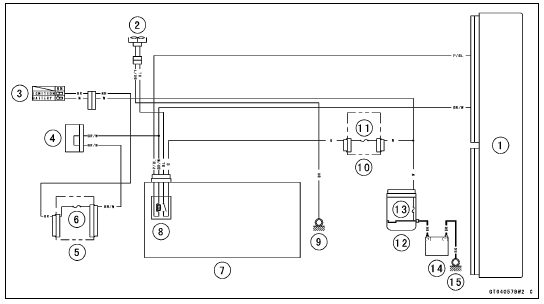
1. ECU
2. Fan Motor
3. Ignition Switch
4. Joint Connector F
5. Fuse Box 1
6. Ignition Fuse 15 A
7. Relay Box
8. Fan Relay
9. Frame Ground 3
10. Fuse Box 2
11. Fan Fuse 15 A
12. Starter Relay
13. Main Fuse 30 A
14. Battery
15. Engine Ground
 Radiator Fan Relay Removal/Installation
Brake Pedal Removal
Remove:
Rear Master Cylinder Mounting Bolts [A]
Foot Guard [B]
Screw and Stopper [C]
Bolt [D]
Front Footpeg Bracket Bolts [E]
Cable Guide [F]
Remove:
Cotter Pin [A]
Joint Pin [B]
Rear Brake Light Switch Spring [C]
Return Spring [D]
Remove the brake pedal mounting b ...
Brake Disc Warp Inspection
Raise the wheel off the ground with the jack.
Special Tools - Jack: 57001-1238
Jack Attachment: 57001-1608
For front disc inspection, turn the handlebar fully to one
side.
Set up a dial gauge against the disc [A] as shown in
the figure and measure disc runout, while turning [B] the
...
Torque Limiter Installation
Apply molybdenum disulfide grease to the torque limiter
shaft [A].
Install the torque limiter [B], the collar [C] and the shaft.
Turn the large-hole end of the shaft to inside as shown in
the figure.
Replace the washer [D] with a new one.
Apply a non-permanent locking agent to the t ...
