
NOTICE
Immediately wash away any brake fluid that spills.
NOTE
If the caliper is to be disassembled after removal and if compressed air is not available, disassemble the caliper before the brake hose is removed (see Caliper Rubber Parts Replacement in the Periodic Maintenance chapter).
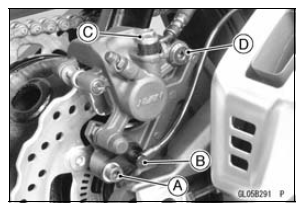
 Front Caliper Removal
 Caliper Installation
Front Fender Removal
Remove:
Bolts [A] with Washers (Both Sides)
Reflectors (Both Sides, US, CA, CAL and AU Models)
Front Fender [B]
Take the brake hose off the clamp [C] (both sides).
Front Fender Installation
Apply a non-permanent locking agent to the front fender
mounting bolts.
Tighten:
...
Ignition System
WARNINGThe ignition system produces extremely
high voltage.
Do not touch the spark plug, ignition coil or ignition
coil lead while the engine is running, or you
could receive a severe electrical shock.
NOTICE
Do not disconnect the battery cables or any other
electrical ...
Subthrottle Valve Actuator Inspection
NOTE
Be sure the battery is fully charged.
Remove the air cleaner housing (see Air Cleaner Housing
Removal in the Fuel System (DFI) chapter).
Turn the ignition switch to ON.
Check to see that all the subthrottle valves [A] open and
close smoothly.
Turn the ignition switch to OFF.
I ...