
NOTICE
Do not lay the wheel on the ground with the disc facing down. This can damage or warp the disc.
Place blocks under the wheel so that the disc does not touch the ground.
 Engine Sprocket Installation
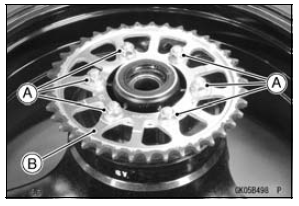
 Rear Sprocket Installation
Piston Removal
Remove:
Crankshaft (see Crankshaft Removal)
Remove the piston together with the connecting rod to the
cylinder head side.
NOTICE
Discard the connecting rod bolts and nuts. To prevent
damage to the crankpin surfaces, do not allow
the connecting rod bolts to bump against the
crankpins. ...
Water Temperature Sensor Output Voltage Inspection
NOTE
Be sure the battery is fully charged.
Turn the ignition switch to OFF.
Remove the throttle body assy (see Throttle Body Assy
Removal in the Fuel System (DFI) chapter).
Disconnect the water temperature sensor connector and
connect the measuring adapter [A] between these connectors
...
Caliper Installation
Install the caliper and brake hose lower end.
For the front caliper, be sure to install the collars [A].
Replace the washers on each side of hose fitting with new
ones.
Touch the brake hoses [A] to the stopper [B] of the caliper.
Front Calipers [C]
Rear Caliper [D]
Tighten:
To ...