Kawasaki Ninja Service Manual: Shift Pedal Installation
- Install the rubber damper to the shift pedal.
Turn the chamfered side to inside.
- Assemble:
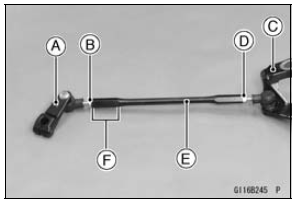
Shift Lever [A] and Locknut [B] (Left-hand Thread)
Shift Pedal [C] and Locknut [D]
Tie-Rod [E]
Turn the grooved end [F] of the tie-rod to the shift lever.
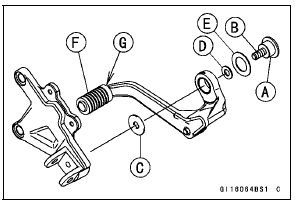
- Apply grease to the sliding surface [A] on the shift pedal
mounting bolt [B].
- Apply a non-permanent locking agent to the thread of the
shift pedal mounting bolt.
- Install:
Washer [C] (Inside Diameter: 8.2 mm, 0.32 in.)
Shift Pedal Assembly
Washer [D] (Frame No. JKAZXCJ1CA011772
 Outside
Diameter: 16 mm, 0.63 in.)
Washer [E] (Frame No. JKAZXCJ1CA011772
 Inside
Diameter: 18.3 mm, 0.72 in.)
- Tighten:
Torque - Shift Pedal Mounting Bolt: 25 N·m (2.5 kgf·m, 18
ft·lb)
- When installing the rubber damper [F], install it so that the
chamfered side [G] faces inward.
- Align the punch mark on the shift shaft with the slit [A] of
the shift lever.
- Tighten the shift lever bolt.
- After installation, the shift pedal lower surface [B] aligns
with the tie-rod lower surface [C].
If the pedal position is different, adjust it as follows.
- To adjust the pedal position, loosen the front locknut (left
-hand threads) and rear locknut, and then turn the tie-rod.
- Tighten the locknuts securely.
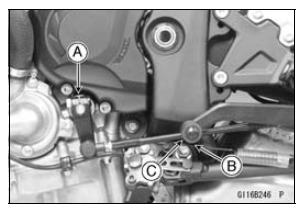
Remove:
Shift Lever Bolt [A]
Front Footpeg Bracket Bolts [B]
If the tie-rod [C] is to be removed from the shift pedal and
the shift lever, loosen the tie-rod locknuts [D].
The front tie-ro ...
Remove:
Shift Lever (see Shift Pedal Removal)
Oil Pump Drive Gear (see Oil Pump Drive Gear Removal/
Installation in the Engine Lubrication System
chapter)
Circlip [A]
Washer [B]
Spec ...
Other materials:
Safe riding technique
The points given below are applicable for everyday motorcycle use and
should
be carefully observed for safe and effective vehicle operation.
For safety, eye protection and a
helmet are strongly recommended.
You should be aware of and verify
the applicable safety regulations in
force prior ...
Cylinder Head Cover Removal
Remove:
Air Suction Valves (see Air Suction Valve Removal)
Throttle Body Assy (see Throttle Body Assy Removal in
the Fuel System (DFI) chapter)
Stick Coils (see Stick Coil Removal in the Electrical System
chapter)
Remove the clamps [A].
Turn up the front side of the heat insulation ...
Intake Air Temperature Sensor Output Voltage Inspection
NOTE
Be sure the battery is fully charged.
Turn the ignition switch to OFF.
Remove the fuel tank (see Fuel Tank Removal in the Fuel
System (DFI) chapter).
Disconnect the intake air temperature sensor connector
and connect the measuring adapter [A] between these
connectors as shown in ...

 Shift Pedal Removal
 External Shift Mechanism Removal