
NOTICE
Do not tap the coil head while installing the coil.
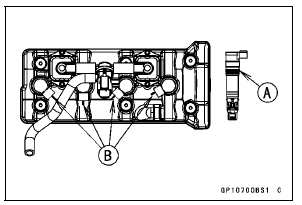
 Stick Coil Removal
 Stick Coil Inspection
Engine Vacuum Synchronization Inspection
NOTE
These procedures are explained on the assumption that
the intake and exhaust systems of the engine are in
good condition.
Situate the motorcycle so that it is vertical.
Remove:
Fuel Tank (see Fuel Tank Removal in the Fuel System
(DFI) chapter)
Air Cleaner Housing (see Air Cleaner ...
Hub Bearing Inspection
Since the hub bearings are made to extremely close tolerances,
the clearance can not normally be measured.
NOTE
Do not remove any bearings for inspection. If any bearings
are removed, they will need to be replaced with
new ones.
Turn each bearing in the hub back and forth [A] while
checki ...
Radiator Fan System
Fan Motor Inspection
Remove the air cleaner housing (see Air Cleaner Housing
Removal in the Fuel System (DFI) chapter).
Disconnect the connector [A].
Using an auxiliary leads, supply battery power to the fan
motor.
If the fan does not rotate, the fan motor is defective and
must be re ...