
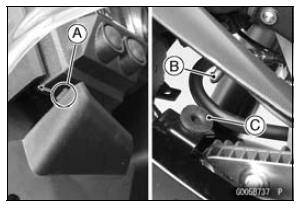
Place the tab [A] under the cover as shown in the figure.
Insert the projection [B] into the grommet [C].
 Upper Inner Fairing Removal
 Center Inner Fairing Removal
Axle Inspection
Remove the front and rear axles (see Front/Rear Wheel
Removal).
Visually inspect the front and rear axle for damages.
If the axle is damaged or bent, replace it.
Place the axle in V blocks that are 100 mm (3.94 in.) [A]
apart, and set a dial gauge [B] on the axle at a point
halfway ...
Solenoid Valve Inspection (Service Code b 13, b 14, b 17, b 18)
The solenoid valve is built in the KIBS Hydraulic Unit [A].
Therefore the solenoid valve cannot be checked directly.
Perform the Pre-Diagnosis Inspection 1 and 2 (see Inquiries
to Rider in the Brakes chapter).
If any of these service codes appears even if all checks
are ended, replace t ...
CAL and SEA-B1 Models
1. Green Hose (Purge)
2. Clamp (hold the white hose.)
3. Canister
4. White Hose (Vacuum)
5. Blue Hose (Breather)
6. Red Hose (Return)
7. Separator
8. Quick Rivet
9. Face the hook portion of the bracket to inside of the vehicle.
10. Clamp (Bend down the clamp, and hold the blue hose, the ...