
If they do not, adjust the chain slack and align the wheel alignment (see Drive Chain Slack Adjustment).
NOTE
Wheel alignment can be also checked using the straightedge or string method.
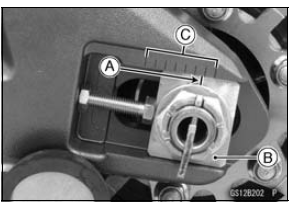
|
WARNING Misalignment of the wheel will result in abnormal wear and may result in an unsafe riding condition. Be sure the wheel is properly aligned. |
 Drive Chain Slack Adjustment
 Drive Chain Wear Inspection
Exhaust Butterfly Valve Actuator Inspection
NOTE
Be sure the battery is fully charged
Remove the front seat (see Front Seat Removal in the
Frame chapter).
Turn the ignition switch to ON.
In the left side view of the motorcycle, check to see
the pulley [A] clockwise [B] and counterclockwise [C]
smoothly.
The pulley turns ...
Engine No. ZXT00JE003023
1. Heat Insulation Rubber Plate
2. For Air Switching Valve Hoses (Place the air switching valve above the
rubber plate.)
3. For Stick Coils
4. For Throttle Body Assy Holder #2 and #3
5. For Water Temperature Sensor
6. Insert the tab into the slot.
7. For Throttle Body Assy Holder #4
8. ...
Replacement Parts
Replacement parts must be KAWASAKI genuine or
recommended by KAWASAKI. Gaskets, O-rings, oil seals,
grease seals, circlips, cotter pins or self-locking nuts must
be replaced with new ones whenever disassembled.
Assembly Order
In most cases assembly order is the reverse of disassembly,
howe ...