
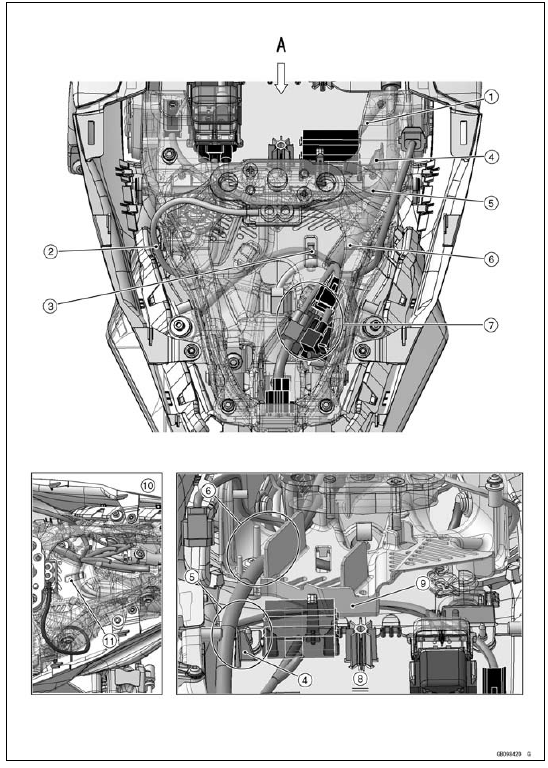
1. Run the fuse box 2 lead in front of the rib for the fuse box 2.
2. Seat Lock Cable
3. Hook the licence plate light lead and the left turn signal light lead on the projection of the tool kit case.
4. Rib for Fuse Box 2
5. Run the starter relay lead in back of the rib for the fuse box 2 and quick rivet. Take care not to stick the quick rivet.
6. Run the main harness between the rib and projection of the tool kit case.
7. Place all connectors into the dust cover.
8. Viewed from A
9. Run the starter relay lead under the tool kit case.
10. US, CA and CAL Models
11. Hook the licence plate light lead, the left and right turn signal light leads on the projection of the tool kit case.
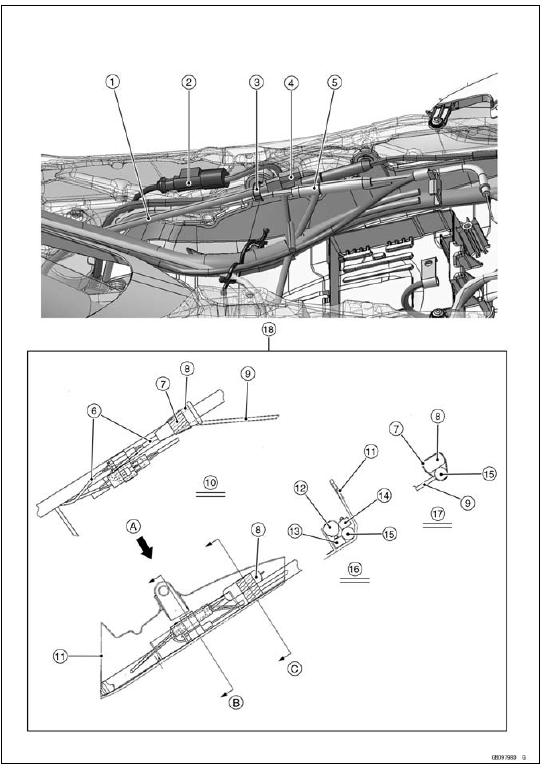
1. Run the rear brake light switch lead to inside of the exhaust butterfly valve cables.
2. Rear Wheel Rotation Sensor Lead Connector (Place it in front of the clamp and between the exhaust butterfly valve cables and the frame.)
3. Clamp (Hold the exhaust butterfly valve cables and the rear brake light switch lead. Insert the strip of the clamp from lower side.)
4. Rear Brake Light Switch Lead Connector (Place it in back of the clamp and above the rear wheel rotation sensor lead.)
5. Run the exhaust butterfly valve cables to inside of the rear brake light switch lead.
6. Do not slack the leads.
7. Tape (Hold the main harness and the wire lead.): L = 150
 200 mm (5.91
 7.87 in.)
8. Wire Lead
9. Fuse Box 1 Lead
10. Viewed from A
11. Rear Fender Front
12. Exhaust Butterfly Valve Actuator Connector (3-pin)
13. 2-pin Connector (Wire Lead – Exhaust Butterfly Valve Actuator)
14. 2-pin Connector (Main Harness – Wire Lead)
15. Main Harness
16. Viewed from B
17. Viewed from C
18. ZX1000JB/KB Models
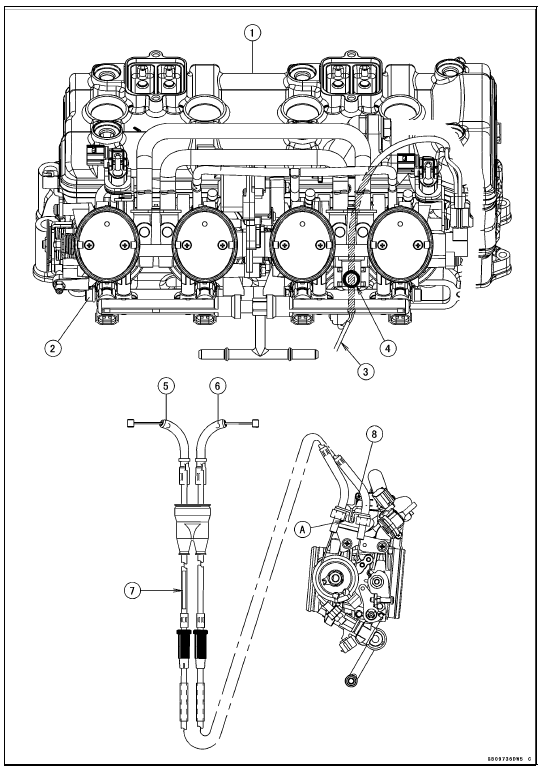
1. Cylinder Head Cover
2. Throttle Body Assy
3. Run the throttle sensor leads leftward.
4. Run the throttle sensor leads under the throttle body assy and between the #3 and #4 of the throttle body assy holder.
5. Throttle Cable (Accelerator)
6. Throttle Cable (Decelerator)
7. White Letters
8. Hold both the cables with the clamp of the accelerator cable, and hook the clamp to the hole [A].
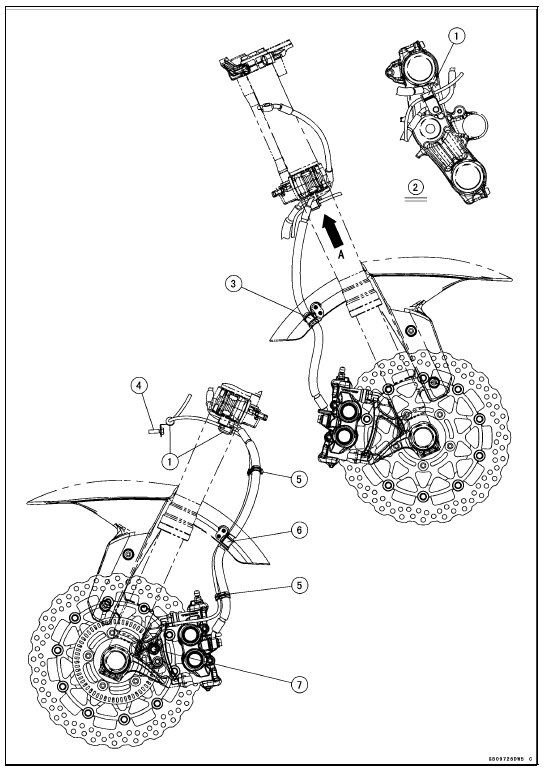
1. Clamp (Hold the damper of the front wheel rotation sensor lead.)
2. Viewed from A
3. Clamp (Run the front brake hose.)
4. Headlight Mounting Bolt
5. Clamp (Hold the front brake hose and the front wheel rotation sensor lead at the white painted position of the lead. Run the lead in front of the hose.)
6. Clamp (Run the front brake hose only.)
7. Front Wheel Rotation Sensor
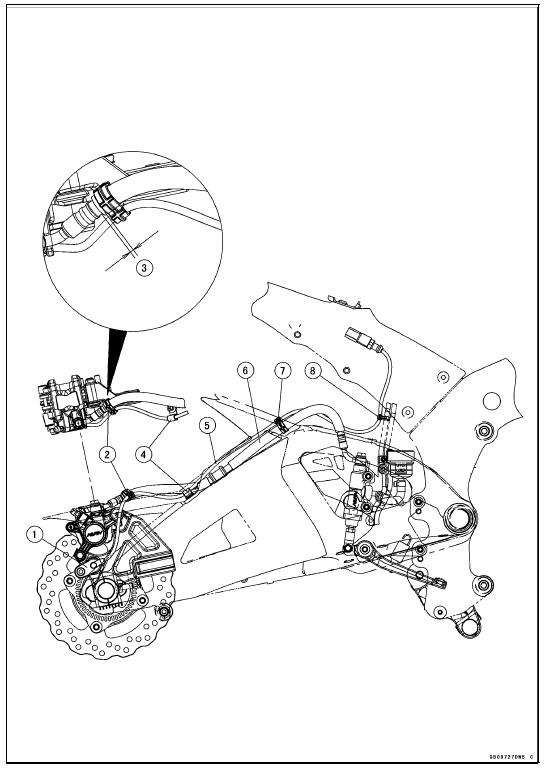
1. Rear Wheel Rotation Sensor
2. Clamp (Hold the rear brake hose and the rear wheel rotation sensor lead at the white painted position of the lead. Run the lead to outside of the hose.)
3. About 0  5 mm (0
 0.2 in.)
4. Clamp (Hold the rear wheel rotation sensor lead.)
5. Run the rear wheel rotation sensor lead to outside of the mud guard.
6. Run the rear brake hose to inside of the mud guard.
7. Clamp (Hold the rear brake hose and the rear wheel rotation sensor lead at the white painted position of the lead. Run the lead above the hose.)
8. Clamp (Hold the exhaust buttery valve cable and the rear wheel rotation sensor lead at the white painted position of the lead. Run the lead in back of the cable.)
 ZX1000JB/KB Models
 KIBS Equipped Models
KIBS Equipped Models
1. Clutch Cable
2. Vacuum Hose (Equipped Models)
3. Left Switch Housing Lead
4. Main Harness
5. Front Brake Hose
6. Throttle Cables
7. Right Switch Housing Lead
8. Bracket (Hold the brake pipes.)
9. Run the meter lead to outside of the meter bracket.
10. Run the vacuum hoses to inside o ...
Engine Oil
In order for the engine, transmission,
and clutch to function properly, maintain
the engine oil at the proper level,
and change the oil and replace the oil
filter in accordance with the Periodic
Maintenance Chart. Not only do dirt
and metal particles collect in the oil, but
the oil itself los ...
Multifunction Meter
A. Multifunction Display
Odometer
Trip Meters
Current Mileage
Average Mileage
Fuel consumption
Stop Watch
B. Speedometer
C. Gear Position Indicator
D. Power Mode Indicator
E. S-KTRC Mode Indicator
F. Warning Symbols
G. Lap Counter/Coolant /
Intake Air Temperature
Meter
...