
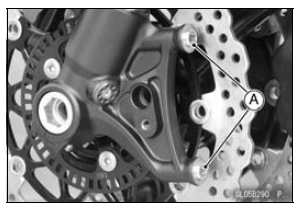
For the front caliper, be sure to install the collars [A].
Replace the washers on each side of hose fitting with new ones.
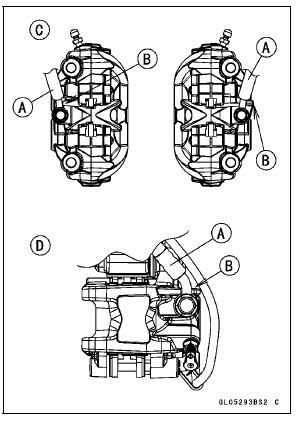
Touch the brake hoses [A] to the stopper [B] of the caliper.
Front Calipers [C] Rear Caliper [D]
| WARNING After servicing, it takes several applications of the brake lever or pedal before the brake pads contact the disc, which could result in increased stopping distance and cause an accident resulting in injury or death. Do not attempt to ride the motorcycle until a firm brake lever or pedal is obtained by pumping the lever or pedal until the pads are against the disc. |
Front Caliper Disassembly
Front Caliper Assembly
Rear Caliper Disassembly
Refer to the Caliper Rubber Parts Replacement in the Periodic Maintenance chapter.
Rear Caliper Assembly
Refer to the Caliper Rubber Parts Replacement in the Periodic Maintenance chapter.
 Rear Caliper Removal
 Caliper Fluid Seal Damage
Clutch Lever Installation
Install the clutch lever so that the mating surface [A] of the
clutch lever clamp is aligned with the punch mark [B] of
the handlebar.
Tighten the upper clamp bolt first, and then the lower
clamp bolt.
Torque - Clutch Lever Clamp Bolts: 7.8 N·m (0.80 kgf·m, 69
in·lb)
There will be ...
Stick Coil Input Voltage Inspection
NOTE
Be sure the battery is fully charged.
Turn the ignition switch to OFF.
Remove the ECU (see ECU Removal in the Fuel System
(DFI) chapter).
Do not disconnect the ECU connectors.
Connect a digital meter [A] to the connector [B] with the
needle adapter set.
Special Tool - N ...
Coolant Reserve Tank Installation
Install the following to the coolant reserve tank [A].
Pad [B]
Gasket [C]
Cap [D]
Collar [E]
Install the coolant reserve tank and tighten the bolt [F].
Run the hoses correctly (see Cable,Wire, and Hose Routing
section in the Appendix chapter).
Fill the coolant reserve tank with ...