
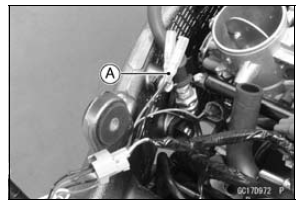
Main Harness [B] Primary Fuel Injector #1 [C]
Special Tool - Measuring Adapter: 57001-1700
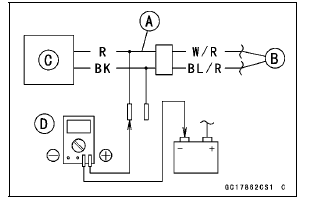
Primary Fuel Injector Power Source Voltage Connections to Adapter:
For Primary Fuel Injector #1, #2, #3, #4
Digital Meter (+) → R (injector W/R) lead
Digital Meter (–) → Battery (–) terminal
Power Source Voltage Standard: Battery Voltage for 3 seconds, and then 0 V
If the reading stays on battery voltage and never shows 0 V, check the fuel pump relay (see Relay Circuit Inspection in the Electrical System chapter).
If the fuel pump relay is normal, check the ECU for its ground and power supply (see ECU Power Supply Inspection).
If the ground and power supply are good, replace the ECU (see ECU Removal/Installation).
If there is still no battery voltage, check the fuel pump relay (see Relay Circuit Inspection in the Electrical System chapter).
If the ground and power supply are good, replace the ECU (see ECU Removal/Installation).
If there is still no battery voltage, check the fuel pump relay (see Relay Circuit Inspection in the Electrical System chapter).
If the fuel pump relay is normal, check the power source wiring (see wiring diagram in this section).
Special Tool - Hand Tester: 57001-1394
If the wiring is good, check the ECU for its ground and power supply (see ECU Power Supply Inspection).
If the ground and power supply are good, replace the ECU (see ECU Removal/Installation).
If the reading is in specification, check the output voltage (see Fuel Injector Output Voltage Inspection).
 Fuel Injector Power Source
Voltage Inspection
Fuel Injector Power Source
Voltage Inspection For Secondary Fuel Injectors
Idle Speed Control Valve Actuator Input Voltage Inspection
NOTE
Be sure the battery is fully charged.
Turn the ignition switch to OFF.
Disconnect the idle speed control valve actuator connector
and connect a suitable measuring leads [A] between
these connectors as shown in the figure.
Main Harness [B]
Idle Speed Control Valve Actua ...
ECU Communication Error (Service Code 39)
ECU Communication Line Inspection
When the data is not sent from the ECU to the meter unit
for more than about 10 seconds, the service code 39 is
displayed.
The data is sent through the CAN communication line.
The service code 39 is detected with the meter unit.
When the user mode, this commun ...
Front and Rear Brakes
Disc and disc pad wear is automatically
compensated for and has no effect
on the brake lever or pedal action.
So there are no parts that require adjustment
on the front and rear brakes.
WARNINGAir in the brake lines diminish
braking performance and can
cause an accident resulting ...