
If the indicator light does not go on, replace the meter unit.
 Check 3-3: High Beam Indicator Light (LED) Inspection
 Check 3-5: Warning Indicator Light (Red LED) (Oil Pressure Warning)
Inspection
Check 3-5: Warning Indicator Light (Red LED) (Oil Pressure Warning)
InspectionNozzle Assy Disassembly
Remove the nozzle assy (see Nozzle Assy Removal).
Pull out the secondary fuel injectors [A] from the delivery
pipe assy [B].
NOTE
Do not damage the insertion portions of the injectors
when they are pulled out from the delivery pipe assy.
NOTICE
Never drop the secondary fuel injecto ...
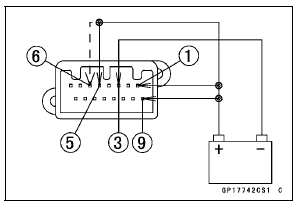
Terminal Numbers of ECU Connectors
1. Subthrottle Valve Actuator: Y/BK
2. Subthrottle Valve Actuator: BK/O
3. Unused
4. Front Wheel Rotation Sensor Signal: G/Y
5. Unused
6. Starter Lockout Switch: R/G
7. Gear Position Switch: G/R
8. Crankshaft Sensor (–): BK
9. Power Supply to Sensors: BL
10. Unused
11. Intake Air Pre ...
Passenger’s Seat Removal
Remove the passenger’s seat by inserting
the ignition key into the seat
lock, and turning it clockwise.
A. Seat Lock
B. Ignition Key
C. Passenger’s seat
D. Pull up
NOTE
When removing the passenger’s
seat, pull it up while turning the key. ...