
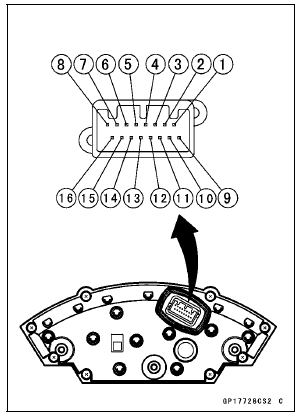
[1] Battery (+) [2] Fuel Reserve Switch [3] Ground (–) [4] Unused [5] Right Turn Signal Indicator Light (LED) (+) [6] Left Turn Signal Indicator Light (LED) (+) [7] High Beam Indicator Light (LED) (+) [8] Neutral Indicator Light (LED) (–) [9] Ignition (+) [10] Warning Indicator Light (Red LED, for Oil Pressure Warning) (–) [11] CAN Communication Line (Low) [12] CAN Communication Line (High) [13] Stop Watch (+) [14] Lap Time (+) [15] Power Mode Button (+) [16] S-KTRC Button (+)
NOTICE
Do not drop the meter unit. Place the meter unit so that it faces upward. If the meter assembly is left upside down or sideways for a long time or dropped, it will malfunction. Do not short each terminals.
 Check 2-3: Intake Air Temperature Inspection
 Check 3-1: CAN Communication Line Resistance Inspection
Oil Pump Drive Gear Installation
Install is the reverse of removal. Note the following.
First, engage the oil pump chain [A] to the gears, and then
install the oil pump drive gear [B].
Turn the “OUT” mark [C] to outside.
Apply a non-permanent locking agent to the oil pump drive
chain guide bolt and the oil pump drive ...
Balance Adjustment
If the wheel always stops in one position, provisionally
attach a balance weight [A] on the rim at the marking using
adhesive tape.
Rotate the wheel 1/4 turn [B], and see whether or not the
wheel stops in this position. If it does, the correct balance
weight is being used.
If the whe ...
Premuffler Chamber Installation
Replace the premuffler chamber gasket [A] with a new
one.
Install the premuffler chamber gasket to the premuffler
chamber [B] until it is bottomed so that the chamfer side
faces exhaust pipe [C].
Install the exhaust pipe clamp [D] as shown in the figure.
Insert the projection [E] into ...